
Introduction: EIFS Installation in Qatar
EIFS installation (External Insulation and Finishing System) is a specialized construction process that transforms building facades while adding superior thermal insulation. Unlike simple painting or cladding, EIFS installation creates a complete building envelope system that reduces energy consumption by 40-60% while providing a durable, weather-resistant finish.
At Insugreen, we’ve completed hundreds of EIFS installation projects across Qatar, from residential villas to commercial towers. This comprehensive guide explains the complete EIFS installation process, from surface preparation through final finishing, with real specifications, timelines, and quality standards that ensure decades of performance in Qatar’s extreme climate.
Whether you’re planning EIFS installation for a new building or retrofitting an existing structure, understanding the proper installation process is essential for achieving the thermal performance and longevity that EIFS systems are designed to deliver.
What is EIFS Installation?
EIFS installation is the process of applying a multi-layer external insulation and finishing system to building walls. The complete EIFS installation includes:
Layer 1: Adhesive Layer – Bonds insulation boards to existing wall substrate
Layer 2: Insulation Layer – EPS foam boards (typically 50-150mm thick) providing thermal resistance
Layer 3: Base Coat Layer – Polymer-modified cement reinforced with fiberglass mesh
Layer 4: Finish Coat Layer – Decorative textured coating in desired color and pattern
Unlike facade painting which only changes appearance, or simple EIFS cladding which may be purely decorative, proper EIFS installation creates a complete thermal envelope that fundamentally changes building energy performance.
Why Proper EIFS Installation Matters
The difference between professional EIFS installation and poor installation is dramatic:
Professional EIFS Installation Results:
- 40-60% reduction in cooling energy consumption
- 25-40 year system lifespan
- No cracking, delamination, or moisture issues
- Consistent thermal performance across entire facade
- Full manufacturer warranty coverage
Poor EIFS Installation Results:
- Only 20-30% energy savings due to gaps and thermal bridges
- System failure within 5-10 years
- Cracking at joints and penetrations
- Water intrusion and hidden damage
- Voided warranties and expensive repairs
In Qatar’s climate with extreme temperatures, UV radiation, and occasional heavy rain, proper EIFS installation technique is critical. Surface temperatures can exceed 70°C, creating enormous stress on adhesive bonds and finish coatings. Only correctly executed EIFS installation withstands these conditions long-term.
EIFS Installation Process: Complete Step-by-Step Guide
Step 1: Site Assessment and Preparation (1-2 Days)
Before EIFS installation begins, thorough site assessment ensures compatibility and identifies potential issues.
Substrate Evaluation:
- Inspect existing wall condition (concrete block, poured concrete, CMU)
- Test surface soundness and adhesion
- Identify and repair any structural cracks or damage
- Check for moisture issues or water intrusion
- Verify wall plumbness and flatness (maximum 6mm variation per meter)
Preparation Requirements:
- Remove all loose material, dust, efflorescence, and contaminants
- Repair damaged concrete or masonry
- Fill large voids or honeycombing
- Apply primer if substrate is highly porous or dusty
- Install temporary weather protection if needed
Critical Standards: Surface must be structurally sound, clean, dry, and properly cured. New concrete must cure minimum 28 days before EIFS installation. Substrate moisture content must be below 6% by weight.
Poor substrate preparation is the leading cause of EIFS installation failure. Work with experienced thermal insulation companies in Qatar who understand local building conditions and proper preparation requirements.
Step 2: Detail Planning and Layout (1 Day)
Proper EIFS installation requires detailed planning before materials are applied.
Control Joint Layout:
- Plan expansion joints every 5-7 meters horizontally and vertically
- Align joints with building structural divisions
- Detail joints at floor lines, corners, and facade changes
- Specify appropriate joint sealants and backing materials
Penetration Details:
- Plan flashing and sealing for all windows and doors
- Detail drainage provisions around openings
- Specify treatment for electrical boxes, vents, fixtures
- Plan for pipe penetrations and service entries
Transition Details:
- Detail connection to roof edge and parapet
- Plan foundation termination and moisture barrier
- Specify treatment at material changes (stone, metal panels, etc.)
- Detail inside and outside corners
Thickness Variation Planning:
- Mark areas requiring different insulation thickness
- Plan smooth transitions between thickness zones
- Identify areas needing extra reinforcement
This planning phase is critical for sustainable building performance. Proper details prevent thermal bridges and ensure continuous insulation coverage.
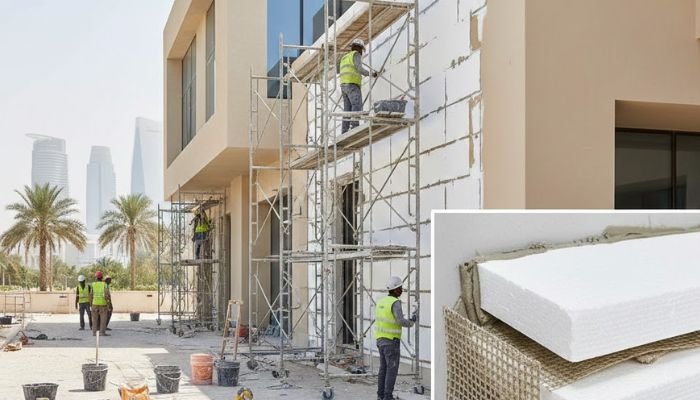
Step 3: EPS Foam Board Installation (3-7 Days for Typical Villa)
The insulation layer is the foundation of EIFS thermal performance. Proper board installation is critical.
Material Specification:
- EPS density: Minimum 15 kg/m³ for wall application
- Board thickness: 50-150mm depending on thermal goals (typical 75-100mm for Qatar villas)
- Board size: Standard 1200mm × 600mm boards
- Material: EPS foam board meeting ASTM C578 specifications
Installation Process:
Adhesive Application Method: Ribbon and spot method – Apply adhesive in continuous ribbons around board perimeter (50mm from edges) plus 5-6 spots in center area. This provides 40-60% coverage while allowing vapor diffusion.
Board Placement: Start from bottom, working upward. Stagger joints in running bond pattern (like brickwork). Press boards firmly against wall, achieving full contact. Use temporary fasteners if needed until adhesive cures.
Joint Treatment: Boards must fit tightly with maximum 3mm gaps. Fill any gaps over 6mm with foam adhesive (never stuff with loose EPS pieces). Sand or rasp board edges if needed for tight fit.
Mechanical Fastening: Install minimum 4-6 fasteners per board after adhesive initial set (2-4 hours). Use plastic plate fasteners driven flush with board surface. Fastener pattern ensures boards stay in place during base coat application.
Inside and Outside Corners: Use full boards at corners – never small pieces. Interlock boards at corners for maximum strength. Consider using factory-cut corner boards for cleaner installation.
Window and Door Openings: Cut boards precisely to fit around openings. Install continuous EPS sill board below windows with proper slope for drainage. Detail jamb and head conditions per manufacturer specifications.
Quality Control During Installation:
- Check board flatness continuously (maximum 3mm variation over 3 meter span)
- Verify tight joints and proper stagger pattern
- Ensure adequate adhesive coverage and fastening
- Protect installed boards from damage and moisture
Boards should cure minimum 24 hours before base coat application. This insulation installation method also applies to expanded polystyrene insulation systems for other applications.
Step 4: Base Coat and Mesh Reinforcement (4-8 Days)
The base coat creates a protective, impact-resistant layer over the insulation and provides substrate for the finish coat.
Materials:
- Polymer-modified base coat mortar (acrylic or acrylic-silicone polymer)
- Alkali-resistant fiberglass mesh (minimum 145 g/m², 4mm × 4mm weave)
- Additional heavy mesh for impact zones and corners
- Corner beads and edge profiles
Application Process:
First Base Coat Layer: Apply 3-4mm thick base coat to EPS surface using notched trowel. Work in sections approximately 1 meter square. Apply mortar with enough pressure to achieve good adhesion to foam.
Mesh Embedding: Immediately embed fiberglass mesh into wet base coat. Overlap mesh minimum 75mm at all joints. Mesh should be centered in base coat thickness (not against foam surface). Use trowel to fully embed mesh, removing all wrinkles and air pockets.
Second Base Coat Layer: After first coat reaches initial set (2-4 hours), apply second 3-4mm base coat layer. Total base coat thickness should be 6-8mm with mesh fully encapsulated in center.
Reinforcement at Openings: Apply additional diagonal mesh strips at all window and door corners (300mm × 300mm at 45-degree angle). This prevents cracking at stress concentration points.
Impact Resistant Areas: Use double layer of standard mesh or single layer of heavy impact mesh (340 g/m²) at ground level (up to 2 meters height) and other vulnerable areas.
Corner Reinforcement: Install PVC or metal corner beads at all outside corners. Embed in base coat and finish smooth. At inside corners, fold mesh or use pre-formed corner mesh.
Control Joint Installation: Install PVC or foam joint backing and sealant backer at all planned control joints. Tool joints to proper profile.
Curing Requirements: Base coat must cure minimum 7 days (longer in humid conditions or cool weather) before finish coat application. During curing, protect from rain, direct sun, and temperatures below 5°C or above 35°C.
Quality Standards:
- Base coat thickness 6-8mm total (measured with thickness gauge)
- Mesh fully embedded (not visible, not against foam)
- No soft spots or voids when tapped
- Smooth surface ready for finish (maximum 1mm deviation over 2 meter span)
This reinforced base coat provides impact resistance and crack control that distinguishes professional EIFS installation from amateur work.
Step 5: Finish Coat Application (3-5 Days)
The finish coat provides color, texture, and final weather protection. Multiple finish types are available for EIFS installation.
Finish Coat Types:
Acrylic Finish: Most common, excellent color retention, good flexibility, cost-effective. Thickness 1.5-3mm depending on texture.
Silicone Finish: Premium performance, self-cleaning properties, superior water repellency, best for Qatar climate. Slightly higher cost.
Acrylic-Silicone Hybrid: Balanced performance and cost, combines benefits of both technologies.
Application Process:
Surface Preparation: Verify base coat is fully cured (minimum 7 days). Check for any defects or damage. Lightly sand any rough areas. Remove all dust.
Primer Application: Some finish systems require primer coat. Apply per manufacturer specifications. Allow proper drying time.
Finish Coat Mixing: Mix finish material thoroughly. Add colorant if needed (factory pre-tinted preferred). Maintain consistent mixing to ensure color uniformity.
Application Method: Apply with stainless steel trowel or spray equipment (depending on texture). Maintain wet edge to avoid lap marks. Work continuously across entire wall section to ensure uniform appearance.
Texture Creation: Achieve desired texture through trowel technique, brush, or spray pattern. Common textures include fine sand, medium dash, coarse aggregate, and smooth trowel finish.
Thickness Control: Maintain specified finish thickness (typically 1.5-3mm). Too thin reduces durability, too thick increases cracking risk.
Color Consistency: Use material from same production batch for each continuous surface. Blend material from multiple containers to ensure color uniformity.
Curing Protection: Protect freshly applied finish from rain for 24-48 hours. Avoid application in direct sun or temperatures above 35°C. Maintain substrate temperature above 5°C during application and curing.
Quality Standards:
- Uniform color and texture across entire surface
- No lap marks, streaks, or color variations
- Proper texture depth and consistency
- Clean, sharp details at transitions and joints
The finish coat completes the EIFS installation, providing the aesthetic appearance and final weather barrier. For decorative elements, foam decor can be integrated during finish application.
Step 6: Joint Sealing and Detail Completion (1-2 Days)
Final sealing and detail work ensures long-term weather protection.
Sealant Application:
- Apply high-quality polyurethane or silicone sealant at all control joints
- Seal perimeter of all windows and doors
- Seal all penetrations (pipes, vents, electrical boxes)
- Tool sealant joints to proper profile for water shedding
Flashing Installation:
- Verify all window head flashing is properly installed and sealed
- Check sill pans and drainage provisions
- Ensure roof edge termination is properly detailed
- Verify foundation termination with moisture barrier
Penetration Details:
- Install properly sealed trim rings at all penetrations
- Ensure proper slope and drainage at each penetration
- Apply additional sealant as needed
Quality Final Inspection:
- Check all joints and transitions
- Verify no voids or gaps in finish
- Confirm proper water shedding at all details
- Document completed installation
Step 7: Final Inspection and Quality Verification (1 Day)
Professional EIFS installation concludes with thorough quality verification.
Visual Inspection:
- Uniform appearance of finish coat
- No cracks, soft spots, or defects
- Proper color and texture consistency
- Clean, sharp details throughout
Performance Testing:
- Tap test to verify proper adhesion (hollow sound indicates delamination)
- Check joint sealant adhesion and flexibility
- Verify no water intrusion at windows or penetrations
- Infrared scan to identify any thermal bridges or missing insulation
Documentation:
- Photograph completed installation
- Record materials used (batch numbers, quantities)
- Document any deviations from standard details
- Prepare warranty documentation
Touch-up and Correction:
- Repair any identified defects
- Clean overspray or spills
- Touch up any damaged areas
- Final cleaning of windows and adjacent surfaces
EIFS Installation Timeline for Different Building Types
Single-Family Villa (300-400m² wall area):
- Site preparation: 1-2 days
- EPS board installation: 4-6 days
- Base coat application: 5-7 days
- Base coat curing: 7-10 days
- Finish coat application: 3-4 days
- Final details and inspection: 1-2 days
- Total Duration: 21-31 days
Multi-Unit Residential (1,000-1,500m² wall area):
- Site preparation: 2-3 days
- EPS board installation: 10-15 days
- Base coat application: 12-18 days
- Base coat curing: 7-10 days (concurrent with other areas)
- Finish coat application: 8-12 days
- Final details and inspection: 2-3 days
- Total Duration: 35-55 days
Commercial Building (3,000-5,000m² wall area):
- Site preparation: 3-5 days
- EPS board installation: 25-40 days
- Base coat application: 30-50 days
- Base coat curing: 7-10 days (concurrent)
- Finish coat application: 20-30 days
- Final details and inspection: 3-5 days
- Total Duration: 75-120 days
Timelines assume good weather, adequate crew size, and no major substrate issues. These durations can combine with external wall insulation work on other building elements.
Critical EIFS Installation Quality Standards
Adhesive Coverage: Minimum 40% coverage for boards, 100% contact achieved when boards are pressed to wall. Inadequate adhesive is leading cause of EIFS installation failure.
Board Joint Quality: Maximum 3mm gaps between boards. Gaps over 6mm must be filled with adhesive. Large gaps compromise thermal performance and can telegraph through finish.
Mesh Placement: Fiberglass mesh must be centered in base coat thickness. Mesh against foam surface provides no reinforcement. Mesh too close to surface can show through finish.
Base Coat Thickness: Total 6-8mm thickness. Too thin provides inadequate impact resistance. Too thick increases cracking risk.
Finish Coat Thickness: Per manufacturer specification (typically 1.5-3mm). Thickness must be consistent for uniform appearance and performance.
Curing Time Compliance: Minimum 7 days base coat cure before finish application. Insufficient curing leads to finish coat delamination and cracking.
Weather Protection: No EIFS installation work during rain. Protect freshly applied materials from rain for 24-48 hours. No application when substrate temperature is below 5°C or above 35°C.
Working with experienced contractors who understand these standards is essential. Insugreen’s EIFS installation follows manufacturer specifications and industry best practices.
Common EIFS Installation Mistakes to Avoid
Mistake 1: Inadequate Surface Preparation
Applying EIFS over contaminated, weak, or wet substrate leads to adhesion failure. The substrate must be clean, sound, and dry.
Result: Delamination, system failure within 5-10 years
Prevention: Proper inspection, testing, and preparation per manufacturer requirements
Mistake 2: Insufficient Adhesive Coverage
Using too little adhesive or poor application technique reduces bond strength. Boards may appear secure initially but fail under thermal stress.
Result: Boards detaching, especially at upper levels exposed to maximum solar heating
Prevention: Follow ribbon-and-spot method with 40-60% coverage, verify with test panels
Mistake 3: Poor Joint Treatment
Leaving large gaps between EPS boards creates thermal bridges and weak points where cracks develop.
Result: Visible cracks at board joints, reduced thermal performance
Prevention: Cut boards accurately, fill all gaps over 6mm with adhesive
Mistake 4: Inadequate Mesh Reinforcement
Skimping on mesh or poor embedding leads to cracking, especially at stress points like window corners.
Result: Cracks at corners, impact damage, finish coat failure
Prevention: Use specified mesh weight, ensure proper embedding, add diagonal reinforcement at openings
Mistake 5: Improper Base Coat Curing
Applying finish coat before base coat fully cures causes delamination and finish failure.
Result: Finish coat peeling, especially in high-temperature areas
Prevention: Respect minimum 7-day curing period, verify cure with moisture meter if needed
Mistake 6: Ignoring Thermal Expansion
Failing to install control joints or installing them improperly leads to uncontrolled cracking.
Result: Large random cracks as system expands and contracts with temperature
Prevention: Install control joints per design, maximum 5-7 meter spacing
Mistake 7: Poor Weather Protection
Applying EIFS materials in rain or extreme temperatures compromises curing and performance.
Result: Soft spots, poor adhesion, premature failure
Prevention: Check weather forecast, delay work if needed, provide temporary protection
These mistakes are why professional EIFS installation costs more than amateur work, but delivers decades of reliable performance instead of expensive failures.
EIFS Installation Cost Factors
Material Costs (per m²):
- EPS insulation boards (75mm): 15-25 QAR
- Adhesive and fasteners: 8-12 QAR
- Base coat and mesh: 12-18 QAR
- Finish coat: 15-30 QAR (depending on type)
- Sealants and accessories: 5-8 QAR
- Total Materials: 55-93 QAR/m²
Labor Costs (per m²):
- Skilled EIFS installers: 45-70 QAR
- Varies with building height, complexity, access requirements
Total EIFS Installation Cost: 100-163 QAR/m² for complete system
Factors Increasing Cost:
- Building height above 2 floors (scaffolding)
- Complex facade with many openings
- Decorative details or multiple colors
- Difficult access or site constraints
- Premium finish coat selection
- Accelerated schedule requirements
Factors Reducing Cost:
- Large project size (economies of scale)
- Simple facade geometry
- Ground-level or low-rise work
- Standard finish and single color
- Flexible schedule allowing optimal weather windows
Compare with simple facade painting cost of 15-45 QAR/m² – EIFS installation costs 3-4× more initially but delivers 40-60% energy savings and lasts 25-40 years versus 5-8 years for paint.
EIFS Installation vs. Other Insulation Methods
EIFS Installation vs. Spray Foam:
Spray foam insulation is applied internally on roof decks, providing excellent thermal performance but requiring interior ceiling work. EIFS installation is external wall system, combining insulation with facade renewal. For complete building envelope, use spray foam for roof plus EIFS installation for walls.
EIFS Installation vs. American Foam:
American foam insulation typically refers to spray polyurethane foam (SPF) systems. EIFS installation uses rigid EPS boards with cement-based coatings. SPF provides higher R-value per inch but costs more. EIFS installation provides complete weather barrier and aesthetic finish in one system.
EIFS Installation vs. Fiber Cement Board:
Fiber cement board is a cladding material providing decorative facade. EIFS installation combines insulation with cladding in integrated system. Fiber cement over existing wall provides appearance upgrade but no insulation. EIFS installation fundamentally improves building thermal performance.
EIFS Installation vs. Simple Insulation Retrofit:
Basic external wall insulation might use EPS boards plus simple render finish. Complete EIFS installation includes engineered base coat system with mesh reinforcement and premium finish coat. The additional investment in proper system design delivers superior durability and performance.
Energy Savings from Proper EIFS Installation
Typical Qatar Villa (350m² conditioned space, 280m² wall area):
Before EIFS Installation:
- Wall heat gain: 12,000-15,000 kWh/year
- Cooling energy: 4,500-5,500 kWh/month summer average
- Annual cost: 12,000-14,500 QAR
After Professional EIFS Installation (75mm EPS):
- Wall heat gain: 3,000-4,500 kWh/year (75% reduction)
- Cooling energy: 2,700-3,500 kWh/month summer average (40% reduction)
- Annual cost: 7,200-9,000 QAR
Annual Savings: 4,800-5,500 QAR
EIFS Installation Investment: 280m² × 130 QAR/m² = 36,400 QAR
Simple Payback: 6.6-7.6 years
20-Year Net Benefit: 60,000-73,600 QAR (savings minus investment)
These savings combine with benefits from comprehensive energy saving approaches for maximum impact.
Maintaining EIFS After Installation
Proper maintenance extends EIFS installation lifespan to 30-40 years.
Annual Inspection (Every Year):
- Visual inspection for cracks, damage, or deterioration
- Check all joints and sealants for integrity
- Inspect window perimeters for water staining or damage
- Verify no impact damage or penetrations
- Check for any signs of moisture intrusion
Cleaning (Every 2-3 Years):
- Wash surface with low-pressure water and mild detergent
- Remove any algae, mildew, or staining
- Rinse thoroughly with clean water
- Never use high-pressure washing (damages finish)
Joint Maintenance (Every 3-5 Years):
- Inspect control joint sealants
- Remove and replace any cracked or failed sealant
- Reapply sealant at penetrations if needed
- Maintain proper joint depth and profile
Finish Coat Maintenance (Every 10-15 Years):
- Apply fresh finish coat over existing finish
- Repair any cracks or damaged areas first
- Can change color if desired
- Extends system life by another 10-15 years
Repair Needs:
- Small cracks: Fill with elastomeric sealant
- Impact damage: Cut out damaged area, patch with new EIFS layers
- Delamination: Remove failed area, reinstall properly
- Water damage: Identify source, dry out wall, repair all affected layers
Professional maintenance by experienced contractors ensures optimal performance. Contact Insugreen for EIFS inspection and maintenance services.
FAQ: EIFS Installation in Qatar
How long does EIFS installation take for a typical villa?
Complete EIFS installation for a 300-400m² villa takes 21-31 days including all curing time. Larger buildings require 35-120 days depending on size and complexity. Weather delays can extend these timelines.
Can EIFS installation be done while occupants remain in the building?
Yes. EIFS installation is entirely external work. Interior spaces remain fully functional and habitable throughout the project. Some noise and vibration from scaffolding and tools is unavoidable.
What is the lifespan of professionally installed EIFS?
Properly installed EIFS systems last 25-40 years in Qatar’s climate. The finish coat may need renewal at 15-20 years, but the insulation and base coat layers remain functional for decades.
How much energy will EIFS installation save?
EIFS installation typically reduces building cooling energy consumption by 40-60% for walls. Total building energy reduction is 30-45% when walls are the primary source of heat gain, as in most Qatar buildings.
Can EIFS installation be applied to any building type?
EIFS installation works on concrete block, poured concrete, CMU, and most solid substrates. Not suitable for steel stud walls without special framing details. Buildings must be structurally sound with no moisture issues.
What happens if EIFS installation is done incorrectly?
Poor EIFS installation leads to delamination, cracking, water intrusion, and system failure within 5-10 years instead of 25-40 year expected life. Repairs are expensive, often requiring complete removal and reinstallation.
Is EIFS installation more expensive than simple facade painting?
Yes. EIFS installation costs 100-163 QAR/m² versus 15-45 QAR/m² for facade painting. However, EIFS installation includes insulation providing 40-60% energy savings and lasts 25-40 years versus 5-8 years for paint. Total lifecycle cost is lower.
Can EIFS color be changed later?
Yes. A new finish coat can be applied over existing EIFS at 15-20 years, allowing color change and finish renewal. This extends system life another 10-15 years at fraction of original installation cost.
Why Choose Insugreen for EIFS Installation
- Specialized EIFS installation expertise with hundreds of Qatar projects
- Manufacturer-certified installation crews trained in proper techniques
- Quality materials from leading EIFS manufacturers
- Complete system warranty covering materials and workmanship
- Project management ensuring on-time, on-budget completion
- Detailed quality control at every installation phase
- Energy modeling to verify performance before installation
- Post-installation inspection and documentation
- Ongoing maintenance support to protect your investment
Our EIFS installation delivers the thermal performance and durability that these systems are engineered to provide. We don’t take shortcuts that compromise long-term performance.
For comprehensive facade solutions, explore our EIFS siding and cladding options. For complete building envelope performance, we integrate EIFS wall installation with spray foam roof insulation for maximum energy savings.
Conclusion: Professional EIFS Installation Delivers Decades of Performance
EIFS installation is a sophisticated construction process requiring specialized knowledge, proper materials, and skilled execution. The difference between professional installation following manufacturer specifications and amateur work cutting corners is the difference between 30-40 years of reliable performance and expensive failure within 5-10 years.
The EIFS installation process involves seven critical phases: surface preparation, detail planning, EPS board installation, base coat application, finish coat application, joint sealing, and final inspection. Each phase has specific quality standards that must be met for proper system performance.
Investment in professional EIFS installation pays back through energy savings in 6-8 years, then continues delivering benefits for another 20-30 years. Combined with aesthetic improvement and increased property value, EIFS installation is one of the most cost-effective building improvements available.
Contact Insugreen today for EIFS installation consultation and project estimate. We’ll assess your building, explain the complete process, and provide detailed proposal showing expected costs, timeline, and energy savings.
Visit our services page to explore all our insulation and facade solutions, or review our project portfolio to see completed EIFS installation projects across Qatar.